How to Use Cloudflare CDN in WordPress Free? (Step-by-Step)
Slow website speed and poor performance can harm your site’s user experience and rankings. We’re here to speed things up by checking out how to use Cloudflare CDN in WordPress.
Cloudflare CDN is a powerful weapon available with a free plan. It lets you boost your site’s performance, enhance load times, and strengthen security.
Hence, you can deliver content faster to your visitors anywhere in the globe. That too without spending a dime.
This step-by-step guide explores how to use Cloudflare CDN in WordPress. So, set up Cloudflare CDN and take your site to the next level in just a few steps.
Now, let’s get moving!
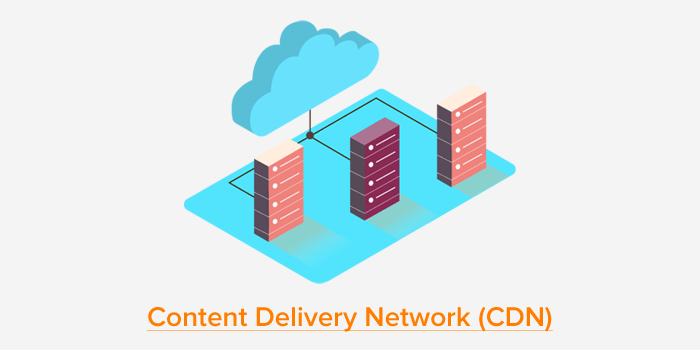
A. What is a CDN? – An Introduction
First, let’s dive into some basic details on CDN and Cloudflare. Shall we?
A CDN (short for Content Delivery Network) is a network of servers located in various parts of the globe. When a user visits your site, the CDN delivers your site’s content from the server closest to them for faster loading speed.
Let’s say your website is hosted in Australia and you have visitors from California. Without a CDN, the data has to travel all the way from Australia to California. Too time-consuming, isn’t it?
Using a CDN makes a difference here. In this scenario, the website’s content is cached on servers closer to the visitors. For example, one CDN in the United States. Ultimately, your website loads much quicker.
Another example can be video streaming. Suppose your video is hosted on a CDN. Then, it can be streamed from the server nearest to your visitor’s location. As a result, it minimizes buffering, and the video plays smoother.
In a nutshell, a CDN makes your website faster and more reliable for its audience. Their location doesn’t matter.
Now, let’s get to know Cloudflare CDN.
B. What is Cloudflare CDN? Why Is It Necessary for Your WordPress Site?
Cloudflare is one of the first connectivity clouds introduced. It’s packed with functionalities, like CDN services, DDoS protection, WAF (Web Application Firewall), and whatnot.
Hence, Cloudflare CDN is a widely used free CDN service for WordPress. It ensures your site is fast and secure, no matter where your visitors access it from.

Connect, fasten, and secure your personal site or an enterprise app. Cloudflare CDN for WordPress offers different solutions for your unique needs.
The reasons why using Cloudflare CDN is crucial for your WordPress website are:
- Improves Site Speed: The powerful caching stores static content in the servers without having to process the same requests repeatedly. This improves site speed, reduces latency, and ensures quicker load times.
- Decreases Server Load: The workload of your servers minimizes due to website caching. This enhances performance and reduces bandwidth usage.
- Ensures Security: This CDN not just makes your website fast, but it also protects the data. Simply put, it provides a shield to your website and potential threats by blocking malicious traffic and preventing DDoS attacks.
- Global Content Delivery: Cloudflare CDN has a global cloud network in 335+ cities in over 125 countries worldwide to distribute your content.
- Cost-Effective: It has a free plan ideal for starter WordPress websites. Get advanced enterprise-level security and performance at just
Overall, your site stays online and secure even under heavy traffic with a CDN.
C. Cloudflare CDN Pricing Plans
Focusing on pricing, Cloudflare has pricing options divided into many sections. They are for application services, Zero Trust SASE, network services, and developer platforms.
Here, we’ll check the application service pricing plans. Check them out:
- Free: $0/mo, CDN, universal SSL certificate, WAF, and more.
- Pro: $20/mo, lossless image optimization, and Accelerated Mobile Pages (AMP).
- Business: $200/mo, 100% uptime SLA (Service Level Agreement), etc.
- Enterprise: A custom plan with network prioritization and more features.

The free plan itself is powerful for personal and small businesses. If you want to know more, then check out the details about the Cloudflare plans on its website.
With that, you can start your free plan and upgrade it whenever necessary.
D. How to Use Cloudflare CDN in WordPress Free? (Step-by-Step)
Now, let’s move forward to our major concern. This section shows you how to setup Cloudflare free in WordPress and how to use Cloudflare CDN in WordPress.
Here we go!
Step 1: Sign Up for a Cloudflare Account for Free
First, you must visit the Cloudflare website and click the ‘Start for Free’ button.

This redirects you to the sign-up page. There, you can either log in directly from your Google or Apple account. Another way is to sign up using an email address and password. Here, we’ll create a new account ourselves.
After you verify as a human, click the ‘Sign up’ button.

Step 2: Add Your WordPress Website to Cloudflare
Once your account is made, you can connect your website to begin sending your traffic through Cloudflare. Just enter your website domain in the blank text field. In fact, you don’t have to type the full URL or additional characters.
Here, we’ll go with ‘example.com.’
Below that, you’ll find three options. They are:
- Quick scan for DNS records
- Manually enter DNS records
- Upload a DNS zone file
Among them, let’s choose the recommended ‘Quick scan for DNS records’ option. Then, click the ‘Continue’ button.

Following that, you get to pick a plan for your added website. Here, we’ll go for the ‘Free’ option, so click the ‘Select plan’ button.

Step 3: Review Your DNS Records
As you’ve chosen to quickly scan the DNS records of your site, the process starts now. Hence, Cloudflare generates a list of DNS records available on their systems. This involves those for your main domain as well as subdomains.

Here, the DNS records that you want to be available on Cloudflare must have an orange cloud icon. This denotes the domain is enabled for being proxied. Simply put, HTTP traffic goes through the Cloudflare network that enables its services.
Hence, you must check the list to ensure your primary domain is active with the orange cloud icon. If it’s not, then press the ‘Proxy status’ toggle to fix it.
On the other hand, other additional DNS records can stay with the gray cloud icon or mentioned ‘DNS only.’ After you’ve verified your DNS records, hit the ‘Continue to activation’ button to move forward.

Step 4: Update Your Nameservers
Next, Cloudflare asks you to update your nameservers to activate the CDN for your website. For that, you must delete the previous ones and add the two new Cloudflare nameservers assigned for your website.

This involves a series of steps, so follow them patiently.
First, log into your DNS provider to change the nameservers. This could be:
- A domain registrar where you got your domain name, like Domain.com.
- A reseller platform like Squarespace, where you bought the domain.
- Or a web hosting provider that offers a free domain for your website.
For this tutorial, we’re going to show the process using a domain registrar. The process for this platform and your used platform can be different. But the end result of both is to replace the current nameservers with those from Cloudflare.
Here are the top domain registrars and the guide on how to choose a domain name.
So, let’s move ahead as a reference for all DNS providers. After logging into the domain registration service, turn off the DNS security setting if it’s on. Later on, you can enable it through Cloudflare.
Afterward, find your active domain to use and click the ‘Edit DNS’ button.

In the ‘Nameserver’ section, you can find your previous domain names. Clear them and copy-paste the new Cloudflare nameservers. With that, click the ‘Edit DNS’ button.

Right after that, your DNS provider will verify and modify the nameservers with the ‘Under DNS Modification’ status. Changing them can take some time, usually a few hours to 1 day. You’ll know if the update is done when there’s an ‘Active’ status for the domain.

Afterward, go back to your Cloudflare account and press the ‘Continue’ button.
Now, you can also check if the Cloudflare CDN is working for your website after changing the nameservers. To do that, you’ll see a new section added below. So, click the ‘Check nameservers now’ button.

Once you finish the steps here and your website also gets added to Cloudflare CDN, you can find the success message.

Moreover, you can also find the ‘Active’ status on the websites list in Cloudflare.

Congratulations on accurately setting up Cloudflare CDN on your WordPress site. But you might need to tweak some of its settings for the best results.
Keep reading to configure those general yet essential Cloudflare settings.
Step 5: Configure the General Cloudflare Settings
Focusing on the configuration settings, let’s start with SSL/TLS.
i. SSL/TLS
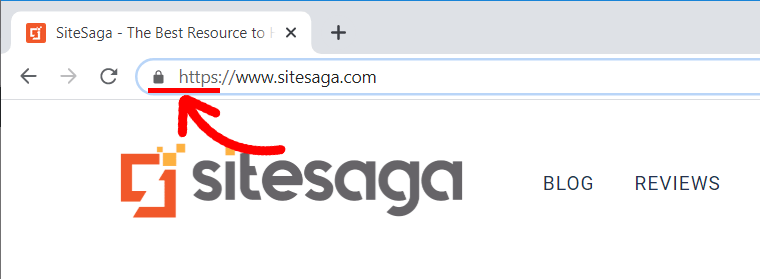
With an SSL (Secure Socket Layer) certificate, your WordPress site will get a padlock and https:// before its URL. This ensures your data securely gets exchanged over a computer network.
For example, here’s how your domain will look with an SSL certificate.
Cloudflare offers an SSL/TLS encryption mode to validate the SSL certificate in your origin server. So, go to the ‘SSL/TLS > Overview’ menu. There, you may already have a default mode selected by Cloudflare.
However, you can go through them and pick a suitable mode. So, click the ‘Configure’ button.

There, you can find several encryption modes to connect Cloudflare and your origin server. They are:
- Flexible: Encryption to work between your visitors and Cloudflare only.
- Full: Get end-to-end encryption if the origin server doesn’t have a valid and trustworthy certificate.
- Full (Strict): End-to-end encryption and enforce validation on origin certificates. Get a certificate with Cloudflare’s Origin Certificate Authority.
- Strict: Enforce end-to-end encryption between Cloudflare and origin for guaranteed connections.
Among them, we recommend going with the ‘Full’ mode. Then, hit the ‘Save’ button.

Moving forward, navigate to the ‘SSL/TLS > Edge Certificates’ menu. There, enable the ‘Always Use HTTPS’ option. This redirects every http request to https format.

Find the best web hosting providers with free SSL.
ii. Page Rules
Another significant setting that you can use is the page rules. This prevents caching problems that can occur and impact the admin panel accessibility.
Cloudflare lets you insert three page rules for free. So, go to the ‘Rules > Page Rules’ menu. There, click the ‘Create Page Rule’ button.

With that, you can enter the URL on which the page rule will be applied. Here, we’ve given an example of ‘example.com/wp-admin.’
After that, pick a setting for the rule. For instance, ‘Cache Level’ is a setting with the rule picked as ‘Bypass.’ To add more, press the ‘+ Add a Setting’ button. Once you’re done, hit the ‘Save and Deploy Page Rule’ button.

Now, explore more settings to fully utilize Cloudflare.
Step 6: Install and Configure the Cloudflare Plugin in WordPress
Did you know that you can configure Cloudflare right in your WordPress dashboard? Yes, that’s possible with the Cloudflare plugin.
Cloudflare is a dedicated WordPress plugin that integrates WordPress and Cloudflare CDN. It lets you smoothly optimize WordPress-related settings.
If you want to use this on your WordPress site, then begin its installation. Just log into your WordPress dashboard and follow the steps to install the plugin from here.
Want a quick guide on the steps? Here we go!
Navigate to the ‘Plugins > Add Plugin’ menu and search for the ‘Cloudflare’ keyword. After you find it in the search results, click the ‘Install Now’ button.

Following that, press the ‘Activate’ button.

After the activation, go to the ‘Settings > Cloudflare’ menu. There, you can log into your Cloudflare account by pressing ‘here.’

This opens a form where you must enter your Cloudflare API credentials. For this, you must access a global API key or API token.
To get access to that, open your Cloudflare account. Just click the top right user icon and press the ‘Profile’ option.

There, go to the ‘API Tokens’ sub-menu. Here, we’ll show the process using an API token. You can also use the global API key.
So, click the ‘Create Token’ button on the ‘API Tokens’ section.

Following that, you can find several API token templates to use for various reasons. Here, we’ll go with the ‘WordPress’ template, so click the ‘Use template’ button.

Next, you can customize the token, including its name, permissions, resources, etc. Once it’s done, click the ‘Continue to summary’ button.

Now, you’ll find the summary of your desired token. Once everything is fine, click the ‘Create Token’ button.

Ultimately, the token gets generated. So, you can click the ‘Copy’ option to use it.

Now, go back to your WordPress dashboard where we had left off before. On the form, enter the email address that you used for the Cloudflare account. Then, paste the API token you had copied. Then, press the ‘Save API Credentials’ button.

With that, the Cloudflare settings will show up on your WordPress dashboard. Amazing, isn’t it?
Step 7: Optimize Your Cloudflare-Based Site
Moving forward, let’s check out the Cloudflare settings you’ll receive after using Cloudflare CDN on WordPress. Configure them according to your needs and optimize your WordPress site for better speed, performance, and security.
i. Home
First, the ‘Home’ section contains a few options. There, the free plugin lets you perform these actions:
- Apply Recommended Cloudflare Settings for WordPress: Click the ‘Apply’ button to use the recommended base configuration options. Now, your site has security and performance settings with recommended values.
- Purge Cache: Press the ‘Purge Cache’ button to clear cached files and let Cloudflare get a fresh version of those files from the origin server.

ii. Settings
Now, open the ‘Settings’ tab to find options for speed and security. This includes:
- Speed Settings: Here, ensure you enabled ‘Always On’ for cache content to the server even in downtime. Further, you can enable auto purge content on update and/or development mode (real-time changes in the origin server).

- Security Settings: Pick ‘High’ as the ‘Security Level’ when you require advanced security. Also, enable automatic HTTPS rewrites to ensure every content, resource, or link gets served with HTTPS.

Check out the different ways to secure your domain name from this guide.
iii. Analytics
Lastly, open the ‘Analytics’ tab. There, you’ll find a ‘Zone Analytics’ section. It’s the built-in Cloudflare analytics module powered by GraphQL.
Here, you can view the analytics for your zone to get an idea of the rich data and filter the data based on several dimensions. Just click the ‘View Analytics’ button.

This redirects you to your Cloudflare account on its website. Particularly, you’ll land on the ‘Analytics & Logs > HTTP Traffic’ menu.
Now, you can check stats and graphs on these areas:
- Web traffic, including requests, bandwidth, and unique visitors.
- Web traffic requests by country.

In addition, it lets you share your stats on your X (formerly Twitter) account.
That’s all we’ve got here! Now, you’re all set!
E. Frequently Asked Questions (FAQs)
Have some basic questions on your mind? Check out some FAQs to find answers:
1. Is it compulsory to install the Cloudflare plugin in my WordPress website?
Installing a Cloudflare plugin in your WordPress site is optional but beneficial for proper integration. It lets you smoothly manage the caching, performance, and security settings right from your admin area.
2. Does Cloudflare help in enhancing my website’s SEO performance?
Search engines favor website speed the most. As Cloudflare improves website speed and reliability, it positively impacts and enhances your website’s SEO, too.
3. What common problems can I likely encounter when using Cloudflare with WordPress?
The common problems when using Cloudflare with WordPress include caching issues, SSL conflict, and plugin compatibility concerns. So, you must troubleshoot by checking the DNS settings, adjusting SSL/TLS configurations, etc.
4. Does Cloudflare support caching plugins like WP Rocket?
Of course, Cloudflare supports caching plugins like WP Rocket. Remember to properly set them up to avoid conflicts and enhance the website’s performance.
5. Should I upgrade to Cloudflare’s Pro plan for WordPress?
Using a free plan already gives robust features for most WordPress websites, including the enterprise-level CDN. You can consider upgrading to the Pro plan if you want enhanced security, performance analytics, or more page rules.
This ends our guide!
If you’re new to website creation, then you can check out our detailed guide on how to make a site from scratch.
Conclusion
That’s all we’ve got in this step-by-step guide!
Hopefully, you understood how to use Cloudflare CDN in WordPress for free.
Therefore, Cloudflare is the ultimate performance optimizer platform. It boosts your site’s speed, reliability, and functionality.
Overall, its free plan itself offers several speed optimization and security measures. So, using it will provide a great user experience to your visitors worldwide.
If you have more questions, then post a comment. In a short while, we’ll get back to you. Hopefully, we’ll be able to resolve your queries.
Until then, check out our other articles on the best CDN services and the best speed optimization plugins.
Lastly, follow us on Facebook and X (Twitter) to find our latest posts of interest to you.
The post How to Use Cloudflare CDN in WordPress Free? (Step-by-Step) appeared first on SiteSaga.