Divi Theme Review 2025 – Is it the Best WordPress Theme?
Are you curious about the buzz surrounding the Divi theme?
Currently, it’s one of the most popular WordPress themes with 1.4 million+ active websites. So, a Divi theme review is a must to know why it is the top choice.
Simply put, Divi is filled with a powerful visual builder, many templates, and endless customization options. So, you can build a professional site with minimal effort.
Guess what? We’ve tested it thoroughly to provide details on its features, pricing, and everything you need to know. It helps a lot for making a choice, right?
Now, let’s investigate whether Divi lives up to the hype!
Video – Is Divi the Best WordPress Theme?
In a hurry? Then, check out our video reviewing the Divi theme.
Want to get into details? Keep reading to find out!
Overall Rating
Divi is one of the best premium WordPress themes popular for different site niches. According to BuiltWith, over 1.4 million active websites are using Divi.
In addition, Elegant Themes scores a perfect 4.9 out of 5 stars as per the average of 24K+ user reviews on Trustpilot.

Undoubtedly, we’ll also give it a remarkable 4.8 out of 5 stars. The 0.2 rating is deducted because there isn’t any free Divi theme version.
In a nutshell, we recommend using Divi if you’re looking for an advanced theme for your website. Start its free demo to understand what Divi is all about. Then, try it for 30 days risk-free with a money-back guarantee policy.
With that being said, let’s jump into the quick pros and cons of Divi.
Pros and Cons of Divi
These are the pros and cons of the Divi theme to quickly help you decide:
Pros of the Divi Theme
- Includes a powerful and real-time visual drag-and-drop builder.
- A highly customizable theme that lets you control every Divi module.
- Offers thousands of starter sites, 2600+ premade layouts, and 200+ modules.
- Contains built-in performance and SEO optimization features.
- Provides a Theme Builder to create custom headers, footers, and templates.
- Completely supports WooCommerce to quickly launch online stores.
- Every license lets you build unlimited websites.
- Lets you check out demos and even includes a 30-day money-back policy.
Cons of the Divi Theme
- It can be overwhelming for beginners in the initial phase.
- Comparatively, this theme is heavier than other lightweight themes.
- It doesn’t offer a free version. So, you purchase a premium plan.
With that, let’s understand the Divi theme thoroughly.
A. What is Divi Theme? – An Overview
Divi is a powerful all-in-one WordPress theme. Indeed, it can transform hectic website building into a truly visual experience.
Simply put, it contains an intuitive Visual Builder called ‘Divi Builder’ to let you design pages on the front end in real time. So, it brings a flexible toolkit to the table to craft any website without any coding required.

Plus, it offers 2600+ premade layouts and thousands of full site packs. You’ll also get powerful design options, custom CSS control, and increasing global elements.
So, you can customize everything, from fonts and spacing to colors and animations. If you want more, then the Divi Marketplace offers thousands of child themes, extensions, and plugins to expand your design possibilities.
Plus, Divi prioritizes performance as it uses a leaner framework and built-in speed optimizations. Responsiveness and SEO-friendliness at their best, too.
In a nutshell, Divi is suitable if you’re serious about simply creating attractive, professional, and fully customizable WordPress sites.
B. Key Features and Highlights of Divi
Now, let’s dive into the key features of Divi and explore what makes it stand out.
1. Customizable Starter Sites
Divi provides thousands of fully customizable starter sites or website packs. Using them lets you quickly kickstart your website design.
These starter sites are built for various site niches. This ranges from small business sites, freelancer needs, and blogs to online stores and web design agencies.
For consistent visuals, a premium starter site contains pre-designed pages, theme templates, module presets, and global styles. Indeed, highly customizable, isn’t it?
Moreover, the beauty of these starter sites is that they come with everything you need: pages, headers, and footers.
So, you can import them with just a few clicks and get started right away, saving you hours of design time.
Just navigate to ‘Divi > Dashboard’ on your WordPress dashboard. There, click the ‘Generate A New Site’ button.

Afterward, press the ‘Select a Website Template’ button for the ‘Use Pre-made Starter Site’ option.

Now, pick a starter site according to your website niche; for example, let’s go with ‘Travel Blog.’ Hover over it and click the ‘Start with Travel Blog’ button.

Following that, provide the site name, slogan, and logo. Also, choose the pages you want on the site and select the preferred color and font options. Then, press the ‘Generate & Publish My Website’ button.

That’s all you’ve to do to import a starter site and begin its customization.
2. FSE-like Capabilities
Full Site Editing (FSE) is prominent in block themes due to its Site Editor that allows you to create the entire site from one place. Divi, despite being a classic theme, has FSE-like capabilities due to its Divi Builder.
This visual builder lets you design and customize each part of your web page from top to bottom from a single location. This includes headers, footers, templates, and content, which aren’t usually possible in classic themes.
However, you can only edit the entire page you open in the visual editor during that time. To customize a different page, you need to access that page first and open the visual editor to configure everything present in that place.
Overall, you’ll need minimum utilization of the theme customizer, widget areas, and page editors. You can do all of their functions inside the Divi Builder with a drag-and-drop real-time interface.
Preview your website’s homepage, and on the upper menu bar, click the ‘Enable Visual Builder’ option. This takes you to the Divi Builder with the FSE-like experience.

As you can see, you can edit the navigation and footer template along with your body content of that page.

Opening another page and enabling the visual builder lets you fully edit that page.
3. 2600+ Premade Layouts
The Divi theme also offers 2,600+ professionally designed premade layouts. These organized layout packs cater to different website niches. This includes businesses, portfolios, blogs, and eCommerce.
Moreover, every layout pack has several page templates. These individual layouts can be home, services, blogs, and contact pages.
With such a large selection, you can easily customize a layout to fit your unique style or use it as a foundation to start building your site.
Moreover, accessing these layouts is possible on both the WordPress dashboard and Divi Builder. You can simply import a layout, stylize content, and that’s all!
For example, you can open the Visual Builder of your website’s homepage. Now, open the three-dotted option in the bottom center, followed by the ‘+’ icon that denotes ‘Insert Layout.’ There, press the ‘Premade Layout’ option.

This opens the layout library with all the layouts and layout packs. Search for the one you need and click the layout pack.
Use the layout pack by clicking the ‘Use This Layout’ button. If you want to add a single layout only, then press the three-dotted option and click ‘Use This Layout.’

4. 200+ Divi Elements and Presets
Another amazing feature! Divi offers 200+ built-in elements to craft any section you want. Some examples are:
- Accordion
- Blurb
- Countdown timer
- Hero
- Map, etc.
Moreover, these elements are highly customizable to tailor the appearance and functionality to meet the required needs. Want to know how to access them?
Just open the Visual Builder and create a new section with the required rows. Now, click the ‘+’ icon and select the module for addition. Tons of choices, isn’t it?
Here, we’ll go with a ‘Button’ element. Tweak it as you want!

On top of that, Divi also introduces presets to let you reuse saved design settings for individual modules. Let’s take an example for the navigation.
Just hover over to the navigation section and click the ‘Edit Header Template’ option. Then, hover over the navigation and click the ‘Row Settings’ icon.
On this pop-up, you’ll find the ‘Preset’ section at the top with an option already chosen. You can click that dropdown option and press any other preset.

In addition, you can edit and configure the preset settings of the particular choice if you want further changes. Easy to streamline the design process, isn’t it?
5. 1000s of Design Options
We’ve already mentioned the premade layouts and presets. When using them, you may have already encountered the customization options for elements.
Well, Divi offers 1000s of built-in design options to build pixel-perfect designs. So, you’ll have the freedom to stylize every site module inside the visual editor.
In fact, every section, row, and module contains content, design, and advanced settings to control your site interface on different devices. This involves everything from custom fonts, colors, and spacing to shadows, animations, and border styles.
For example, let’s go through the design options for an image module. In the visual editor, hover over the image block and click the ‘Module Settings’ icon.
These are the options you’ll find:
- Content: Hover over the image and choose to upload a new image or use the one generated from AI. Also, you can insert a link and admin label.
- Design: Here, you can set the image alignment and use the given filters. Furthermore, you can configure spacing, border, box shadow, animation, etc.
- Advanced: Images can have scroll effects and position definition. Plus, you can set conditions, visibility choices, transitions, custom CSS, etc.
Click the ‘Save Changes’ icon to save the design options configured.

6. Advanced Developer Tools
Are you a developer and building several websites for your freelancing or agency work? Get amazed as Divi offers a suite of advanced developer tools.
Using these tools will let you build dynamic, interactive, and highly customized sites. So, figure out how you’ll utilize all these features:
- Dynamic Content Integration: You can pull dynamic data from ACF (Advanced Custom Fields). Now, you’ll have auto-updated content.
- Advanced Display Conditions: Control the content visibility as per the user role, date, time, login status, etc. Easily provide personalized content.
- Animated Scroll Effects: Divi’s scroll effects let you add engaging animations on modules that respond to user scrolling behavior.
- Supports Custom Code: You can insert custom CSS and JavaScript code into the modules within the visual builder for advanced customization.

By leveraging these tools, developers can build sophisticated websites that are both dynamic and user-friendly. Yes, it’s all within the intuitive Divi environment.
7. Powerful Divi AI
With the growing usage of AI technologies, Divi also introduces Divi AI. An advanced tool integrated into Divi and Divi Builder to streamline site creation.
These are the different AI capabilities that the theme offers:
- AI-Generated Websites: Let AI automatically generate your entire website, including pages, navigation, content, and design. Just provide relevant input about your website, and within a few moments you’ll get your site live.
- AI Content Creation: Instead of typing the text content on your own, you can take help from AI. The ‘Generate Content With AI’ option auto-generates the text content based on your site’s needs and audience.
- AI-Generated Images: The image settings contain the ‘AI’ option that lets the AI generate multiple high-quality images relevant for the module. Choose the one you prefer and match your site’s content.

- Custom AI Code: The ‘Advanced’ setting of a module contains a Custom CSS option. On the black screen, you can click the ‘AI’ option to provide input about the required customization and click ‘Generate Code.’ Instantly, AI writes the desired code for advanced customization.
By leveraging the Divi AI’s capabilities, anyone can quickly build professional, customized sites. Best of all, it’s a valuable asset for web designers and developers.
8. Divi Theme Builder
Along with the visual editor that offers FSE-like capabilities, Divi introduces the Theme Builder. It lets you fully control your site by designing custom layouts, like:
- Posts
- Pages
- Templates for headers, footers, blog posts, category pages, etc.
- 404 error pages
- WooCommerce product, cart, and checkout pages.
Overall, you can assign these templates globally or to certain post types, pages, or categories. For instance, you can have a different header for your logged-in customers. Intriguing, isn’t it?
Just navigate to the ‘Divi > Theme Builder’ menu, and you’ll find the default templates for the overall website, posts, 404 pages, etc.
Click on the ‘Add New Template’ option and choose either to:
- Build New Template
- Add from Library
If you choose from the library, then just select a layout, customize it, and save it.

Otherwise, building a new one involves entering the template settings. Once you choose the type of template, let’s say ‘Blog,’ you can click ‘Create Template.’
Now, edit the header and footer, followed by configuring the body content. By adding ‘All Posts’ to the body content, the Blog template is complete. In the end, press the ‘Save Changes’ button.

9. Other Additional Features
Here are some more features of the Divi theme and additional add-ons you can use:
- Divi Cloud includes cloud storage for designers to manage their projects.
- Integration with WooCommerce to get modules needed for eCommerce.
- With the Divi Marketplace, get exclusive modules, layouts, and themes.
- Use the Divi Teams to manage team access on Divi Cloud and its services.
- The Divi Role Editor lets you control the access to Divi Builder’s abilities.
- Get a centralized dashboard, ‘Divi Dash,’ to manage your sites, licenses, etc.
- Offers a premium Divi Hosting for Divi-built sites with fast performance.
- Divi VIP Support gives fast and expert support via chat and ticketing.
With that, this concludes the Divi theme highlights. But using it requires you to follow the steps serially. Check out the guide next!
C. How to Build a Website with the Divi Theme?
Alright, now we’re about to dive into the process of crafting a website using the Divi theme. Here, we’ll try building a blog website.
This involves purchasing and installing the theme at first. Then, it moves towards using the Divi Quick Sites feature to quickly generate the frontend. After some tweaks to the content and design, your site will be all set.
Without further delay, let’s move forward by purchasing Divi.
Step 1: Divi Purchase Process
Initially, visit the Divi website and click the ‘View Pricing’ button on the navigation. There, you’ll find two pricing options: Divi and Divi Pro.
Each of these has yearly payment and one-time payment choices. So, make your selection and press ‘Sign Up Today’ for your preferred plan. Here, we’ll go with Divi Pro to get access to Divi AI.

By doing that, you’ll be redirected to the registration page. If you pick the Divi plan that offers the theme only, then you can still select the essential add-ons.
In our case, Divi Pro has all the premium features, so you can directly start creating your Divi account. This involves entering your personal and payment information. Once you’re done, click the ‘Complete Registration’ button.

Fast-forwarding the purchase steps like any other WordPress product, you’ll now get your members area. Once you log into it, ensure you’re at the ‘Account > Product Downloads’ menu.
On the ‘Themes & Plugins’ tab, click the ‘Download the Divi Theme’ button. This includes the Divi Builder, Divi AI, and many more add-ons.

Step 2: Divi Installation Process
Once the theme ZIP file gets downloaded, log into your WordPress dashboard. There, go to the ‘Appearance > Themes’ menu. Then, click the ‘Add New Theme’ button at the top.
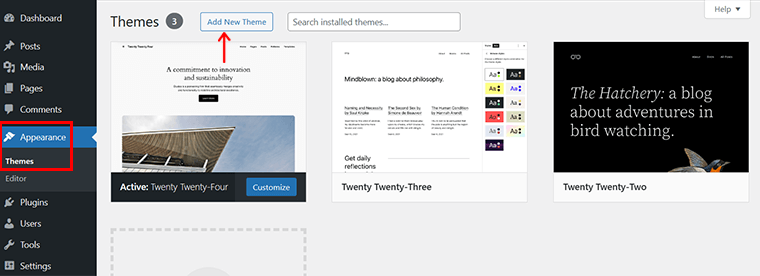
Right after that, hit the ‘Upload Theme’ button. Following that, press ‘Choose File,’ where you can upload the Divi file. Next, click the ‘Install Now’ button to begin the installation process.

Afterward, press the ‘Activate’ option to activate the installed theme.

Right after the installation, you’ll find the newly added ‘Divi’ menu. Within its ‘Dashboard’ menu, you can press the ‘Login To Activate Your License’ button.

Log into your Elegant Themes account to activate and connect your site with it.
With that, you can move toward building your site with Divi.
Check out the detailed guide on how to install a WordPress theme.
Step 3: Generate a Website with Divi AI
The fastest and most effective way of creating a website with Divi is by using its Quick Sites feature. This involves the use of AI or starter sites to craft a new site without needing to manage custom pages, menu items, etc.
So, stay on the ‘Divi > Dashboard’ menu and find the ‘Divi Quick Sites’ section. There, click the ‘Generate a New Site’ button.
Now, you’ll find two options. They are:
- Use Pre-made Starter Site: Choosing this option lets you go through the various site niches, and import a website pack that suits your needs.
- Generate Your Site with AI: Picking this option lets you provide your website needs and Divi AI will generate a website accordingly.
Here, we’ll show the process by using the AI capabilities, so click the ‘Generate My Website’ button of the second option.

Following that, you’ll land on the ‘Tell Us About Your Website’ form. Perform these actions:
- First, provide the website name and slogan.
- Also, insert a little description about your site for Divi AI to do its job.
- Tick the box if you want to enable eCommerce functionalities.
- Then, upload your site logo and suitable images to use from stock, AI, or placeholder options.
- Further, you can customize the fonts and colors or let AI do it for now.
With that, press the ‘Generate & Publish My Website’ button.

Within a few moments, your website will be ready based on your given inputs. This involves the creation of various essential pages and posts through the use of Divi elements, layouts, images, and presets.
Once your site is ready, check out the different pages and theme templates it has. Just view it and get amazed!

Step 4: Customize Your Site with Divi
Moving forward, you may want to customize your AI-generated website to ensure it has everything you want and how you want it. You can do this in various steps.
1. Theme Options
Let’s first adjust the Theme Options that let you control the global settings to determine your site design and functions. So, navigate to the ‘Divi > Theme Options’ menu and utilize these options:
- General: Configure the navigation bar, color palette, sidebar layout, date format, number of posts to display on pages, etc. Adjust the performance features, including dynamic CSS, icons, module framework, etc.
- Navigation: Set the general navigation settings along with those for pages and categories to fix how you want to display them.
- Builder: Enable or disable Divi Builder for posts, pages, and projects. Plus, configure advanced builder settings, like product tour and classic editor.
- Layout: Adjust the layout of single pages and single posts. Further, set what your post information section will contain.
- Ads: Configure the un-widgetized advertisements of your website.
- SEO: Manage the homepage, simple posts/pages, and index page SEO settings. This involves showing the titles, meta descriptions, keywords, etc.
- Integration: Enable or disable code integration at different site locations.
- Updates: Provides the version rollback option to not get the recent updates.
Once you’ve made the changes, don’t forget to click ‘Save Changes.’

2. Theme Customizer
If you don’t find an option here, then go to ‘Divi’ and then ‘Theme Customizer.’ The customizer has configuration options for every website section.

These are the various settings and options available for customization:
- General Settings: Adjust site identity (title, tagline, and icon), layout settings (content width, primary color, etc.), typography (text size, style, color, etc.), and background (color and image).

- Buttons: Configure the button style (size, color, radius, etc.) and hover style (color, spacing, etc.).
- Blog: Manage the post settings, such as font style and letter spacing.
- Mobile Styles: Check and set the height and text size on tablets and phones. Also, adjust how the mobile menu will look.
- Color Schemes: Pick from the given color scheme options.
- Menus: Create a new menu or adjust the existing one like any other theme.
- Widgets: Configure the sidebar by adjusting the added widgets.
- Homepage Settings: Select your homepage to be the latest posts or a static page. If it’s a static page, then pick which page is your home and blog pages.
- Additional CSS: Insert additional CSS code to stylize your site.
After you’re done using the Customizer, hit the ‘Publish’ button.

3. Visual Builder
Now, you’re almost done with the settings and basic customization.
But what about its overall content? And what about the look and feel of each site element? This can be easily done with the Divi Builder, the ultimate visual builder.
Let’s use this real-time builder to customize the homepage of the AI-generated blog site. So, preview the homepage and click the ‘Enable Visual Builder’ option.
Now, the visual builder will offer a full site editing-like capability. So, you can drag and drop the elements and change the content from the header to the footer. In fact, you’ll receive customization options to stylize each element.
For example, let’s adjust the first banner’s text. Just select the block and type the required text like the block editor. To get more options, hover over that block and click the ‘Module Settings’ icon.

This heading has settings divided into three parts for styling and configuration. They are:
- Content: You can type the text yourself or click the ‘Generate Content With AI’ option. Plus, it has link, background, and admin label options.
- Design: Add a text shadow, adjust module height and width, configure the spacing, border, and box shadow, and set transformation and animation.
- Advanced: Set conditions, visibility choices, and transitions. Also, define CSS IDs and classes to insert custom CSS for the module.
Be sure to save changes with the ‘tick’ option.

Notably, like how you did for a specific module, you can also do it for the entire row or section. This ensures your site is unique and matches your brand needs.
Editing the entire content and styling each section of all pages and posts is a piece of cake with the Divi theme.
Step 5: Add/Save a New Section and Layout
Indeed, your new website already looks great. But you may want to remove unwanted content or add new sections or create layouts, right?
Let’s check out the process of doing so within the visual builder.
1. Delete Unwanted Sections
First, let’s start with the easy one, i.e., removing a section. For example, we’ll remove this latest posts section.
Just hover over the section and press the ‘Delete Section’ icon. That’s it!

You can do the same for a specific module or row, too.
2. Add a New Section
Moving forward, let’s add a new section. Hover over the blank space and click the ‘+’ option in the center.
Now, pick if you want to start from scratch or add it from the Divi library. Here, let’s go with adding a new section. This also has three options:
- Regular
- Specialty
- Fullwidth
- Generate Section With AI
This time let’s go with a ‘Regular’ section with a general two-columns option for adding the row.

Now, let’s add the Divi elements in this section. The first row will contain a ‘Blurb.’ You can alter the text and image content of this element along with some styling.
Similarly, the next one will contain a ‘Video’ module. So, customize it as you like.

3. Save the New Layout or Section
Moving on to the saving part. You can save your entire customized page as a new layout. Just click the three-dotted option in the center, which opens various options. There, hit the second ‘Save to Library’ icon.
With that, a form popups where you can perform these actions:
- Enter the layout name
- Choose to save it to Divi Cloud
- Define whether to save all the individual sections, rows, and modules.
- Specify the layout category.
- Include the layout tags.
Once you’re done, click the ‘Save to Library’ button.

Now, whenever you want to insert a layout, along with Divi’s options, your saved layout will also show up for you.
Don’t want to save the entire website as a layout, but a specific section, row, or module that you made? Yes, it’s possible.
For example, let’s save the newly created section. Hover over the new section and click ‘Save Section to Library.’

A similar pop-up opens where you can enter the section details to save and reuse it later. Amazing, isn’t it?

There are several more options and settings in the Divi theme. Explore yourself and get the best result. Real-time editing of your entire site makes it easy, right?
Step 6: Preview Your New Site
Once you’re all done, click the three-dotted option in the center and hit the ‘Save’ button to ensure everything gets saved.
Now, click the ‘Exit Visual Builder’ option in the WordPress menu.
With that, preview your homepage from top to bottom, created in minutes using the Divi theme. Happy with the results, aren’t you?

D. Customer Support Options in Divi
Now, moving on to the customer support options. Be surprised by what Divi offers.
- Divi has a chatbot to initiate the general conversation on its website.
- But you can directly get assistance from the team whether you’re a new or existing customer. Quickly chat to get the support you urgently want.
- Another support service is through the contact form. You can enter your details with your message to a specific team according to your concern area.
- If you’re seeking guidance on using the theme or learning its features, then you can visit its Documentation page. There, you’ll find tutorials from basic installation to complex developer features.
- Already a Divi user and need support? Your members area, accessible from your account, offers a Help section. This provides the priority or VIP support based on your plan. So, have a conversation and get support instantly.
- Do you prefer video tutorials? Then, visit and watch the YouTube channel.

Amazed by the different options, right? Guess what? The service is also top-notch!
E. Pricing Plans of the Divi Theme
As you may have already guessed, Divi is a premium WordPress theme. So, it’s available for purchase on the official Elegant Themes website.
The following are the two pricing options to choose from:
- Divi: $7.42/mo billed yearly, $249 for one-time payment, Quick Sites, Divi Dash, and 300+ site packs for unlimited sites.
- Divi Pro: $23.08/mo billed yearly, $297 for one-time payment, Divi AI, Divi Cloud, and all the premium features.

In addition, Divi offers a 30-day money-back guarantee. So, if you’re not satisfied, you can get a full refund, no questions asked.
Want to purchase Divi? Then, do that from Divi’s pricing page.
F. Comparing Divi Theme’s Top Alternatives
This Divi theme review compares Divi with its top alternatives. The themes are:
- Kadence
- Astra
- Neve
Undoubtedly, each of these themes offers something unique to the table and suits various user requirements. So, this comparison table highlights the major criteria of them to help you further confirm your choice.
| Feature / Area | Divi | Kadence | Astra | Neve |
| Active Installations | 1.4 million + active websites [1] | 400K+ active installations [2] | 1 million + active installations [2] | 300K+ active installations |
| Launched In | 2013 | 2020 | 2009 | 2018 |
| Free Version | No | Yes | Yes | Yes |
| Design Flexibility | Includes Theme Customizer, Theme Builder, and Visual Builder | Contains Header and Footer Builders | Provides custom layouts and hooks. | Offers Theme Customizer |
| WooCommerce Integration | Built-in WooCommerce modules | Deep integration | Complete WooCommerce customization | WooCommerce add-ons available |
| Starting Price | $7.42/mo | $99/year | $49/year | $69/year |
| Our Rating | 4.8/5 | 4.8/5 | 4.7/5 | 4.65/5 |
| Learn More! | Visit the Divi website. | Visit the Kadence website. | Visit the Astra website. | Visit the Neve website. |
G. Is Divi the Best WordPress Theme? – Final Verdict
Divi easily stands out among its competitors in terms of creating highly customizable sites. It offers an intuitive Visual Builder, along with a huge library of website packs, layouts, and modules.
Beyond design, Divi provides the latest technologies. This includes AI-powered tools and speed optimization options.
Overall, it doesn’t matter whether you’re a beginner or experienced developer and whether you’re designing for yourself or for clients. Divi is suitable for anyone.
But it’s the best WordPress theme if you want visual control and incredible value for money. It’s a smart investment for serious site builders.
Frequently Asked Questions (FAQs)
1. Do Divi templates support dynamic content through custom fields?
Yes, Divi supports dynamic content integration. It can pull data from custom fields and display it on your website. This feature is essential for crafting templates with distinct content for different posts or pages.
2. Is it possible to create various headers or footers for specific pages or posts?
Indeed, you can create various headers and footers for specific pages using Divi’s Theme Builder. There, you can design and assign distinct site sections to every page, post, or category.
3. How can I ensure my Divi-built website is mobile-responsive?
Ensuring your Divi-built website is mobile-responsive or not is easy because of its various responsive design controls. You can adjust the layouts, fonts, and other modules for desktops, tablets, and mobile devices through visual editing.
4. Can I build my WooCommerce store using the Divi theme?
Of course, you can build your WooCommerce store using the Divi theme because there’s a smooth integration between them. Divi even offers custom modules and design options suitable for eCommerce capabilities.
5. What is the difference between the Divi theme and Divi Builder?
The Divi theme offers a set of website packs, presets, and modules. It comes with the Divi Builder to easily build your website. On the other hand, Divi Builder provides the visual building interface when using any compatible WordPress theme.
Conclusion
Well, that’s all that we’ve got here!
Hopefully, you’re now all set to build your website if you decided to go with Divi.
This Divi theme review delves into everything you must know before making a choice. But if you’re still concerned, then comment your queries below.
Moreover, it’s best to get acknowledged with more similar content. So, check out our other blogs on the best website builders and Droip WordPress builder review.
Lastly, follow us on Facebook and X (Twitter) to get more updates. Keep going!
References
- [1] https://trends.builtwith.com/framework/Divi
- [2] https://wordpress.org/themes/kadence/
- [3] https://wordpress.org/themes/astra/
- [4] https://wordpress.org/themes/neve/
The post Divi Theme Review 2025 – Is it the Best WordPress Theme? appeared first on SiteSaga.